Creating Dynamic Windows 7 Taskbar Overlay Icons, the MVVM Way
 Since Windows 7 the icon of an application can get an overlay bitmap. You can use that to indicate some state of the application, or–like MetroTwit–to show the number of unread items.
Overlay Icon in WPF
In WPF, the API is pretty simple:
<Window.TaskbarItemInfo>
    <TaskbarItemInfo
        Overlay="{StaticResource ResourceKey=MyOverlayImage}" />
</Window.TaskbarItemInfo>
However, in one of my projects I have to display dynamic text in the overlay, similar to MetroTwit, but above example only shows a static resource.
While searching in the internet I found Pete Brown’s article Creating Dynamic Windows 7 Taskbar Overlay Icons. He uses a WPF DataTemplate to define the content of the overlay, and in his code-behind he takes that template, renders it to a bitmap and assigns it to the TaskbarItemInfo’s Overlay property. See his article for the detailed steps.
Though I think Pete’s solution pretty clever, it lacks the separation of logic and presentation. In my application I don’t want to create images in the code-behind, code-aside, whatever. It follows the MVVM pattern, so the creation of the overlay image shouldn’t be the concern of my viewmodel.
Solution
Extending TaskbarItemInfo doesn’t work because it is sealed. Therefore I took the same route as in my previous post, attaching dependency properties:
public class TaskbarItemOverlay  {
    public static readonly DependencyProperty ContentProperty =
        DependencyProperty.RegisterAttached(
            "Content",
            typeof(object),
            typeof(TaskbarItemOverlay),
            new PropertyMetadata(OnPropertyChanged));

    public static readonly DependencyProperty TemplateProperty =
        DependencyProperty.RegisterAttached(
        "Template",
        typeof(DataTemplate),
        typeof(TaskbarItemOverlay),
        new PropertyMetadata(OnPropertyChanged));


    public static object GetContent(DependencyObject dependencyObject) {
        return dependencyObject.GetValue(ContentProperty);
    }

    public static void SetContent(DependencyObject dependencyObject, object content) {
        dependencyObject.SetValue(ContentProperty, content);
    }

    public static DataTemplate GetTemplate(DependencyObject dependencyObject) {
        return (DataTemplate)dependencyObject.GetValue(TemplateProperty);
    }

    public static void SetTemplate(DependencyObject dependencyObject, DataTemplate template) {
        dependencyObject.SetValue(TemplateProperty, template);
    }

    private static void OnPropertyChanged(DependencyObject dependencyObject, DependencyPropertyChangedEventArgs e) {
        var taskbarItemInfo = (TaskbarItemInfo) dependencyObject;
        var content = GetContent(taskbarItemInfo);
        var template = GetTemplate(taskbarItemInfo);

        if (template == null || content == null) {
            taskbarItemInfo.Overlay = null;
            return;
        }

        const int ICON_WIDTH = 16;
        const int ICON_HEIGHT = 16;

        var bmp =
            new RenderTargetBitmap(ICON_WIDTH, ICON_HEIGHT, 96, 96, PixelFormats.Default);
        var root = new ContentControl {
            ContentTemplate = template,
            Content = content
        };
        root.Arrange(new Rect(0, 0, ICON_WIDTH, ICON_HEIGHT));
        bmp.Render(root);

        taskbarItemInfo.Overlay = bmp;
    }
}
The first lines a boilerplate code to define the attached properties. There are two of them, Content and Template. The former defines, well, the content we’re going to bind to our model. The latter defines the template used to render the content.
The actual work is done in the method OnPropertyChanged. It takes the template together with the content, renders it, and assigns the resulting bitmap to the Overlay property of the TaskbarItemInfo element.
Usage
I have created a small application to demonstrate the use of the attached properties. The XAML of the window is this:
<Window
    x:Class="WpfApplication1.MainWindow"
    xmlns="http://schemas.microsoft.com/winfx/2006/xaml/presentation"
    xmlns:x="http://schemas.microsoft.com/winfx/2006/xaml"
    xmlns:src="clr-namespace:WpfApplication1"
    Title="MainWindow" Height="350" Width="525">
    <Window.Resources>
        <DataTemplate x:Key="OverlayIcon">
            <Grid Width="16" Height="16">
                <Ellipse
                    Fill="Red"
                    Stroke="White"
                    StrokeThickness=".5" />
                <TextBlock
                    Text="{Binding}"
                    TextAlignment="Center"
                    Foreground="White"
                    FontWeight="Bold"
                    Height="16"
                    VerticalAlignment="Center"
                    FontSize="10"/>
            </Grid>
        </DataTemplate>
    </Window.Resources>
    <Window.TaskbarItemInfo>
        <TaskbarItemInfo
            src:TaskbarItemOverlay.Content="{Binding Count}"
            src:TaskbarItemOverlay.Template="{StaticResource OverlayIcon}" />
    </Window.TaskbarItemInfo>
    <Viewbox>
        <TextBlock Text="{Binding Count}" />
    </Viewbox>
</Window>

In the window’s resources we define the template for the overlay. Notice that the Text is bound! Later you can see the TaskbarItemInfo with the attached properties in action: Content binds to the Count property of my viewmodel, and Template references the DataTemplate defined in the resources.
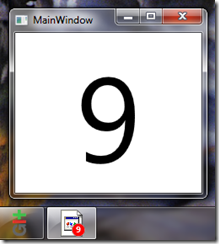
The code-behind is straight forward. I won’t repeat it here, but you can see it at GitHub. Basically it increments the Count property of the viewmodel every seconds in a background thread. You can see the result in the image to the left.
The source code is attached, but also available at GitHub.

Comments
Thomas Freudenberg
Phil, just set the bound property in your viewmodel to null. The overlay icon will be removed automatically (see ll.38 in the code above)
Anonymous
Oh, I see. Using a nullable int for the count property in your sample application works well.
Thank you very much for your support!
Anonymous
Great Post! Thanks for sharing.
How would you hide the overlay icon if the count is zero?
Anonymous
Thanks for the wonderful post! How is it licensed? (Can I use it for non-cmmercial use?)
Thanks again!
Anonymous
can you do hte same thing for a system tray Icon?
Christopher
Should this even work in Windows 10?
Thomas Freudenberg
Yes, the code still works on my machine (Windows 10 1709 Fall Creators Update). Haven’t you tried it by yourself?
John Ukundji
This is piece of art; thanks
Leave a Comment
Your email address will not be published. Required fields are marked *